
Cucumbers are delicious vegetables that can also be cultivated without soil. Before the inception of hydroponic system, gardeners have been looking for ways to cultivate plants in a small space and also get a great result.
Growing cucumbers hydroponically is the best way to ensure a good and successful harvest. Hydroponic cucumbers grow faster and outperform those grown conventionally.
In today's article, am going to walk you through the steps on how to grow hydroponic cucumbers from seed.
Whether you are a hydroponic beginner or someone looking for a new vegetable to grow hydroponically, this article will help kick-start your journey to growing beautiful and amazing hydroponic cucumbers. Without further ado, let's jump right in.
What Are Hydroponic Cucumbers?
Hydroponic cucumbers are cucumbers grown without the use of soil (traditional farming). In this growing method, the cucumbers are grown in a nutrient solution supported by a hydroponic grow pot, clay pebbles, and other hydroponic instruments.
Hydroponic cucumbers grow faster and have a shorter maturation period in comparison to those grown in soil.
Growing cucumbers hydroponically is very easy and requires minimal effort to start. Below are the steps you need to follow to grow successful hydroponic cucumbers.
1. Seed Germination
The first step to growing hydroponic cucumber is seed germination. The cucumber seed can be gotten from any authorized seed store in your location but I prefer getting mine from Walmart.
These seeds are non-GMO and hybrid seeds that grow well and are tolerant to a variety of environmental conditions.
To germinate the seeds you need a couple of items such as;
I. A Seedling Grow Tray/ Container

The container used should be strong and durable. The growing tray or container will act as a medium that holds the seed and the substrate used in seed germination.
II. Rockwool Grow Cubes

These are growing fibers made from basalt after undergoing several industrial processes. The texture of the fiber is soft, it retains, and absorbs moisture very effectively.
Rockwool grow cubes have a very high pH around 7-8. A high pH level such as this could be very detrimental to your plants. So, before using it, ensure to dilute it with water until it reaches a pH level of 5.5-6.
Rockwool grow cubes act as substrate for seed germination. It is essentially used for seed germination because it has good water retention capacity, retains shape after immersion and also very effective in holding a substantial amount of oxygen that allows for the optimal germination of seedlings.
Generally, starting your seedlings in Rockwool is much more convenient than starting in soil. An alternative to Rockwool grow cube is coconut coir which is very rich in potassium and phosphorus.
Coconut coir is also used as substrate for seed germination and offers great benefits to your seedlings as it is natural and consists of beneficial nutrients such as calcium, magnesium, nitrogen, and other trace nutrients.
III. Water
The use of water does go water saying. Water is needed to soften the Rockwool grow cube and also to sprout the seeds.
To plant the seed;
* Place some Rockwool grow cubes inside a container or grow tray
* Pour in some water
* Use scissors to tear open the cucumber seed pack
* Place the seeds inside the wholes of the Rockwool grow cubes
* Allow for some days.

Cucumber seeds are very easy to germinate, the seeds sprout fast and grow quickly.
After adding the seeds to the Rockwool grow cubes, ensure to maintain a temperature of 70-85 °F.
This is the maximum temperature requirement for seed germination as most vegetables tend to do well within this temperature range.
The seed will take about 3-10 days to germinate. After about two weeks your seedlings should be strong enough to be transplanted in your hydroponic system.
2. Transfer The Seedlings to Your Hydroponic System
Have your hydroponic system ready and transplant your seedlings.
If you are new to hydroponic and would like to know more about the system, read here.
To set up your hydroponic system, what I use is a hydroponic grow system I got from amazon.
This system is set already and has all the essential materials your plant needs to survive in the nutrient solution.
But if you rather prefer setting it up yourself, there're just two instruments you need.
To set up your hydroponic system, you would need a plastic storage box, and screw gun.
.png)
Use the screw gun to make holes at the top of the storage box. Ensure the holes are large enough to hold the grow pots.
Make 6 holes at the top of the storage box, 3 on each side. This will give the plants enough space to grow.
Ensure the box used is not transparent but if it is, paint it black or any other color. This is essential to help mimic the natural soil environment.
3. Nutrient Solution
The nutrient solution consists of all the essential ingredients your plant needs to do well. The solution can be easily prepared.
When preparing your nutrient solution, always pay attention to the pH of your water and also ensure appropriate concentrations of fertilizers are added to the water.
To prepare your nutrient solution;
* Fill the box with tap water
* Take the pH reading of the water using a pH meter
* Add pH up if the water pH is below the recommended of 5.5-6.5
* Add pH down if the water pH is above the recommended
* Add a MexiGro hydroponic fertilizer
* Read the instructions carefully before applying
* An EC between 2.0 & 3.0 mS/cm is recommended
* Use an EC meter to measure the EC level of the solution
Your nutrient solution is ready to be used.
4. Hydroponic Planting Cups and Clay Pebbles
Now you need hydroponic planting cups and clay pebbles.
Get planting cups the size of the holes you made on the storage box.
Remove the seedlings from the container gently and put them inside the planting cups.
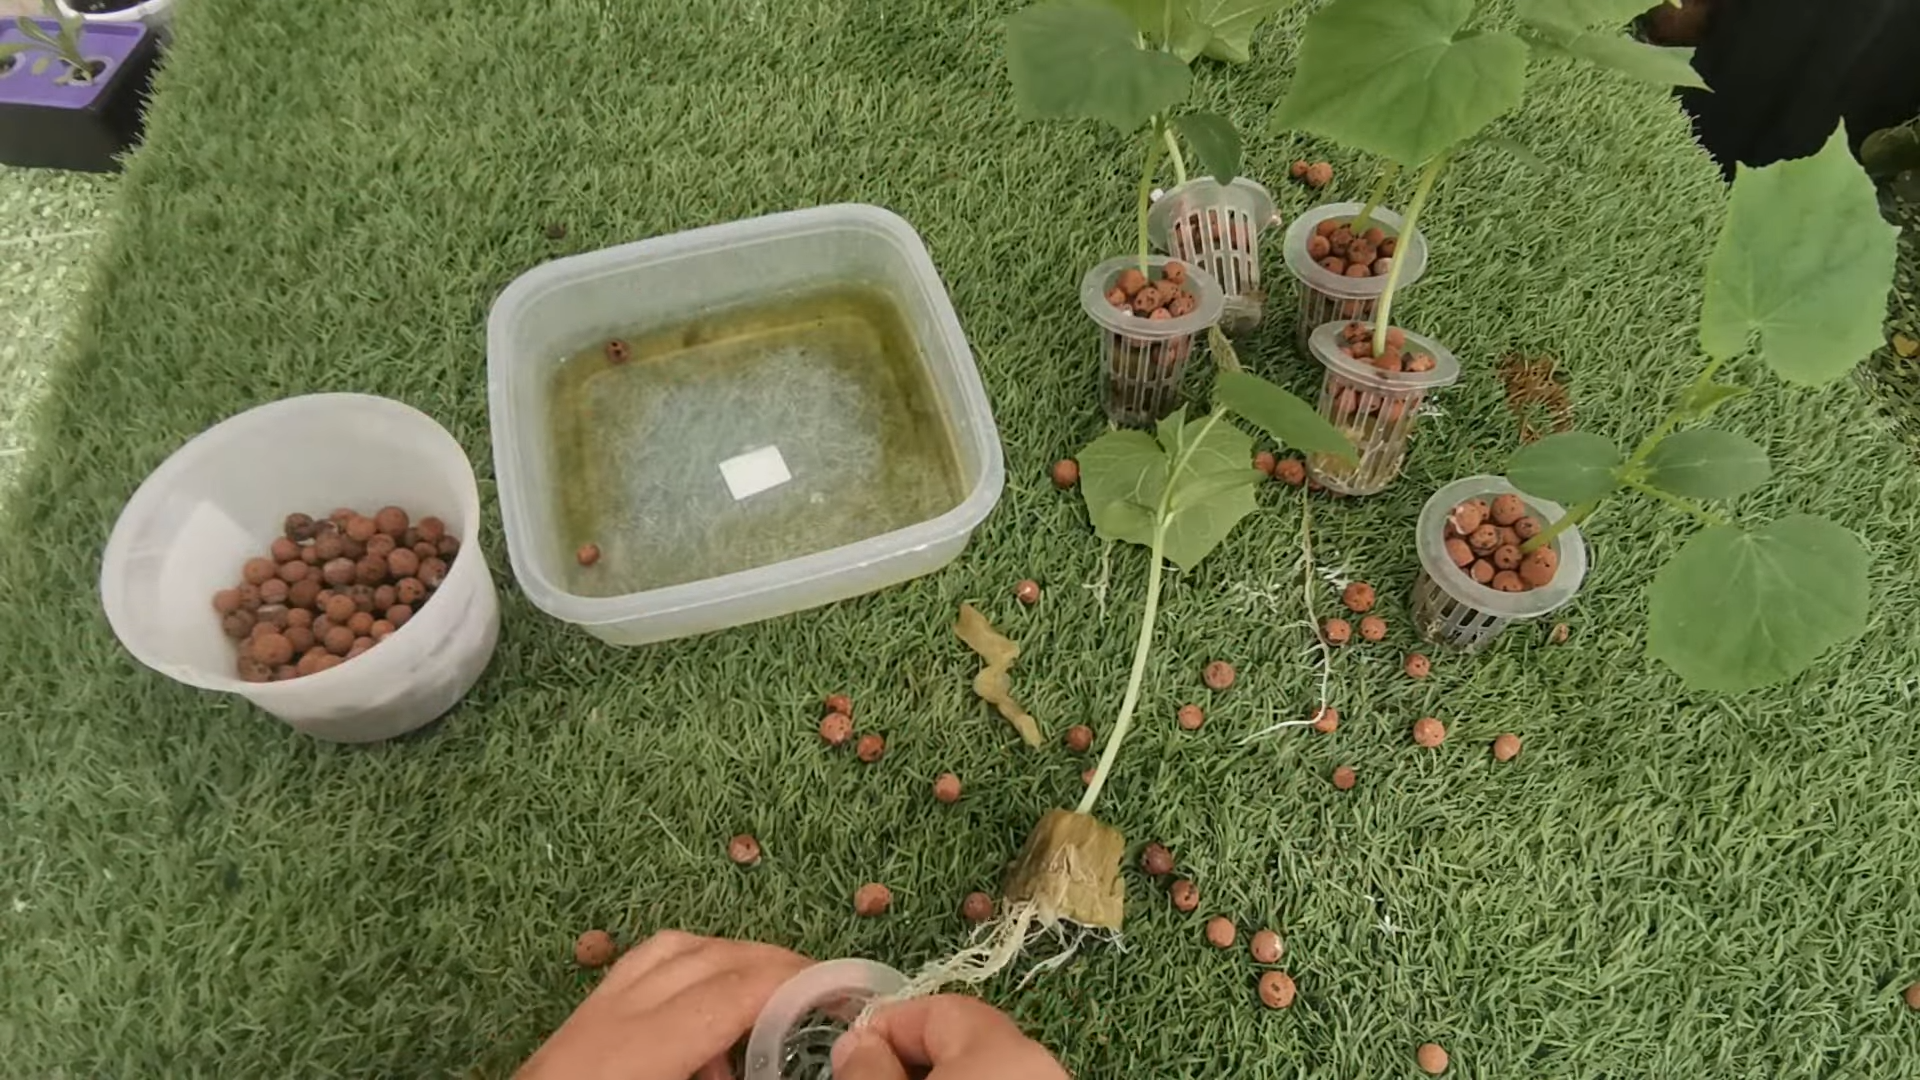
Add clay pebbles to the top, this will help aerate the roots as the clay pebbles stores substantial amount of oxygen and gradually releases it when needed by the roots.
5. Air Pump and Air Bubbles Stone
Get an air pump and air bubble stone. The air pump and air bubble stone help provide oxygen to the roots. This is important to keep fungi and other disease-causing organisms away from your plants.
Organisms such as Pythium cause hydroponic root rot. Check out our follow-up article to see the best way to treat root rot in your hydroponic system here.
Root rot occurs when there is a suitable environment for the organism to thrive.
Pythium thrives well in an anaerobic environment, therefore providing oxygen to your roots with an air pump helps keeps the root environment aerated, preventing the growth of diseases.

Place the bubble stone inside the storage box and cover it, and make a small incision at the top of the storage box for the air pump tube.
You can use a 24hrs mechanical plug timer, and set it at 15 minutes on and 15 minutes off to monitor the operation of the air pump.
This will allow your plants to get as enough oxygen as possible and also aid in nutrient absorption.
6. Sunlight Spot
Choose a spot that gets at least 8hrs of sunlight per day. This will enable your plants to grow effectively.
Poor sunlight will lead to poor growth as the plant will lack the necessary boost to convert sunlight to its food.

Now, gradually insert the grow cups into the holes you made on your storage box.
Ensure that the plant roots are fully submerged in the water, this is important because you want your plants to get all the nutrients in the solution.
At this stage, your hydroponic system is set, now you can sit back and watch your plants grow.
Provide Support To Your Plants
Cucumber plants perk up quickly, therefore you must arrange something to support them. You can construct a trellis yourself or get a cucumber trellis from amazon.
This cucumber trellis is awesome, it is woven with strands of very high-quality nylon threads and it is structured in a way to hold extremely heavy crop loads such as cucumber.
Healthy Roots
A healthy hydroponic root should have a white creamy color. It is important to always check your roots to ensure that there are healthy.
If you notice a slight discoloration in your roots, it is a clear sign that your roots might have been infected. If you are faced with this challenge, I recommend you read here.
.png)
Keeping your roots healthy is very important if you want the optimal growth of your plant.
Keep an eye also on the EC level, if you notice a drop, add fertilizer to maintain the balance.
Your plant should start to flower within 3 weeks, the female flowers usually have a small fruit behind them even before it opens. This makes it very easy to identify.
How Long Does It Take For Hydroponic Cucumbers To Mature?
Hydroponic cucumber fruit ripens at different times on the vines. The specific time of maturity is dependent on the variety of cucumbers you're growing.
While natural species take about 60-70 days to mature, cucumber cultivars can be harvested anywhere from 45-55 days after planting, sometimes below that.

Harvest your cucumbers when they are at least 6-7 inches in length. Don't allow them to overripe on the vine.
This can cause the fruits to become very bitter. To avoid this, harvest them once they get ripe.
Conclusion
Growing cucumbers hydroponically is the best way to ensure maximum harvest. Hydroponic cucumbers grows faster than those planted conventionally.
Following the steps outlined above will enable you to produce lots of cucumber fruits hydroponically.
I hope with this article you can now easily grow your own cucumber plant in your hydroponic system, whether you are a beginner or not.
If you have any questions, please comment down below, and also support us by sharing this article.


No comments:
Post a Comment